User avatar
CDV777-1
Registered User
Registered User
Posts: 1147
Joined: Tue Jan 02, 2007 1:49 am
Real Name: Eric
YouTube Username: vanamonde2
Location: Allen Tx
Contact: Website

Re: Replicating the mini thunderbolt

Sat Dec 06, 2014 9:26 pm

I think I might have a sketch with chopper rotator dimensions on it. I can't remember how legible it is.
I'll dig it out and if it makes any sense at all I'll scan it and post it.
Can you tell me about the challenges of getting this portion working?
That's almost impossible to answer without a long dissertation.
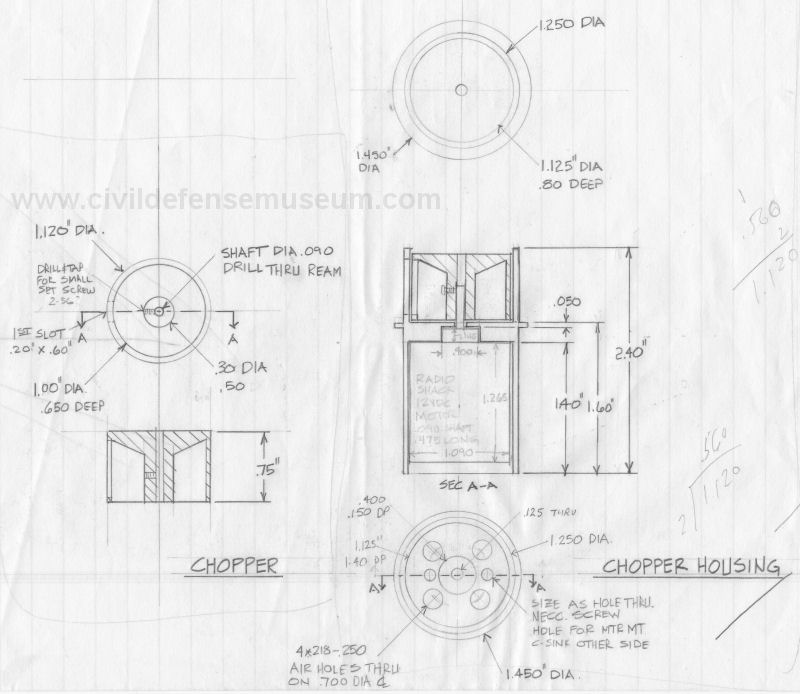
I remember I started with the motor which I got from Radio Shack. I was thinking about a chopper
of about an inch in diameter I just went in and got that motor without thinking much about it other
than I guessed it would be about the right size. It's this motor or very similar to this motor....

http://www.radioshack.com/radioshack-su ... INyiGeROK8

I would have to look again but I think the radio shack number is different than the original motor I got.
I ended up putting a load resistor in the chopper circuit to brink the voltage/rpm down to the right pitch.

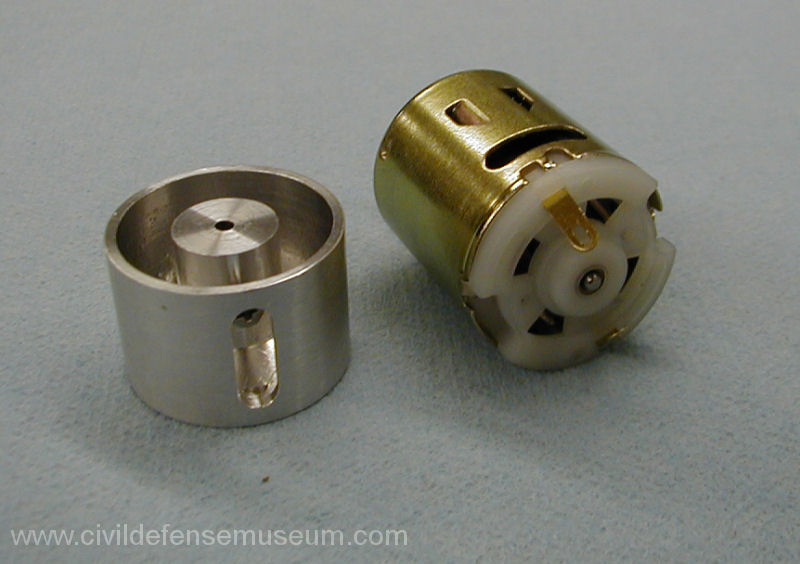
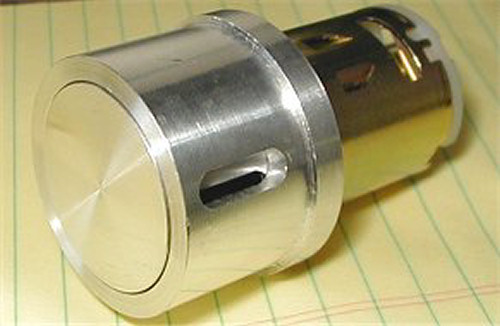
I made the stator first mainly paying attention to getting the motor to slip fit into the bottom of the stator.
I got lucky in that the first motor I got was fairly well built in that if fit well and I didn't have any bad concentricity
issues when I put the chopper onto the motor shaft.
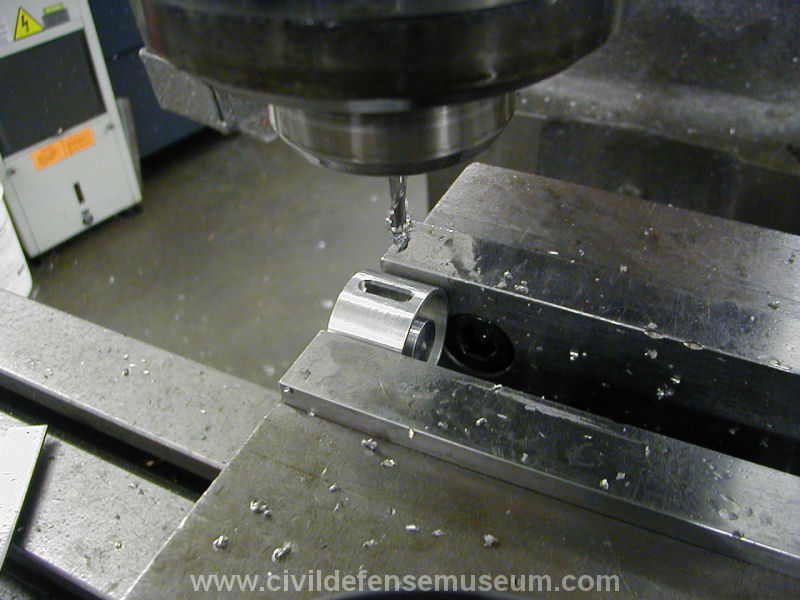
The first chopper I made was only 4 port as you can see in the pic above.
That was really just a test chopper.

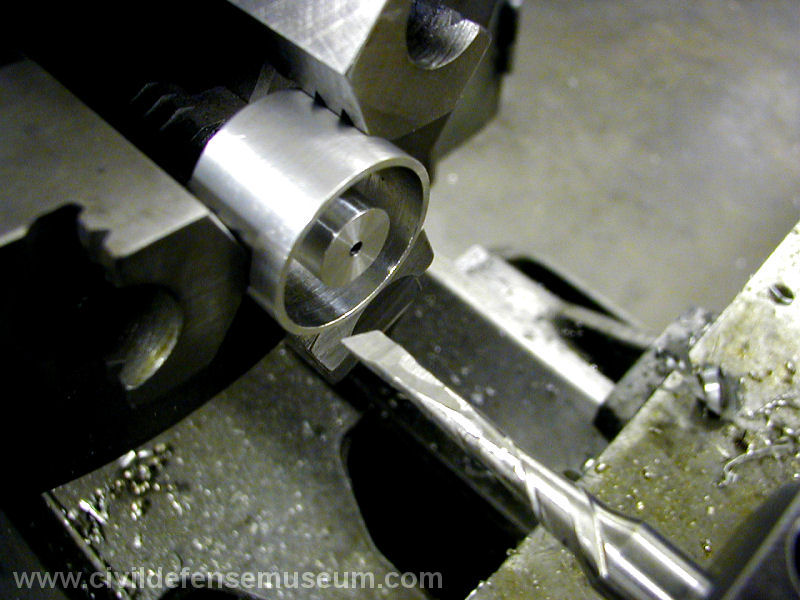
I need to go do something now so I'll look for that dimension sketch and
try to find some of the pics I took while I was making the chopper.
Proud owner of a garage full of junk.

User avatar
CDV777-1
Registered User
Registered User
Posts: 1147
Joined: Tue Jan 02, 2007 1:49 am
Real Name: Eric
YouTube Username: vanamonde2
Location: Allen Tx
Contact: Website

Re: Replicating the mini thunderbolt

Sun Dec 07, 2014 12:02 am

Picking up where I left off. Here is the first drawing I made of the chopper and stator.
I drew this up just after I got the motor from radio shack.
Image
From the start I just wanted to see if I could make something that would make noise.

I started with a single slot chopper and the motor.
Image
This was after I made the chopper but hadn't started the stator yet.

Image
This is the first test chopper and the original stator. The same stator it still has today. Though it's had a lot more work done to it.

Image
I took this pic just after I finished face grooving the chopper. When I started this I only had a round
slug that was turned to the outside diameter and height. I drilled the center hole, reamed it and
turned the face groove all at the same time. You want to do this to reduce the chance of things
being off center. Ideally I would have turned the outside, drilled, reamed and face grooved it all
at the same time.

Image
This was take just after I slotted the single slot chopper. I did it in vise because I only had to do one slot.
To do multiple slots/holes the chopper has to be put in an indexer to get the holes at the correct locations,
Proud owner of a garage full of junk.

User avatar
sirendude2012
Registered User
Registered User
Posts: 665
Joined: Sat Aug 11, 2012 1:49 pm
Real Name: Michael Borjas
YouTube Username: legomn54321
Location: Fremont, Ohio

Re: Replicating the mini thunderbolt

Sun Dec 07, 2014 1:04 am

A method that could greatly reduce the amount of work needed would be to 3D print all the parts. Just make a 3D model of every single part, test fit everything in the modeling program (make sure nothing touches or clips through anything else), get it 3D printed (whether it be at home or through a company like Shapeways) and it will all fit together so long as it fit together in the modeling program. There's certain things you'll have to exclude like the motors, any gearboxes and collector rings, etc. With this method, you can get the tolerances fairly tight so long as all the parts are printed individually. Of course, your limitation here is printing in Plastic, but this way you can make everything quite precise so long as you know your way around the modeling program.

I mean, shoot. people have 3D printed sirens before...
https://www.youtube.com/watch?v=1i3B-pJEjR4

Take advantage of modern technology and print the parts!
THUNDERBOLT HAS BEEN SOLD

User avatar
CDV777-1
Registered User
Registered User
Posts: 1147
Joined: Tue Jan 02, 2007 1:49 am
Real Name: Eric
YouTube Username: vanamonde2
Location: Allen Tx
Contact: Website

Re: Replicating the mini thunderbolt

Sun Dec 07, 2014 2:03 am

Take advantage of modern technology and print the parts!
And the cost is?????
Proud owner of a garage full of junk.

User avatar
sirendude2012
Registered User
Registered User
Posts: 665
Joined: Sat Aug 11, 2012 1:49 pm
Real Name: Michael Borjas
YouTube Username: legomn54321
Location: Fremont, Ohio

Re: Replicating the mini thunderbolt

Sun Dec 07, 2014 2:37 am

CDV777-1 wrote:
Take advantage of modern technology and print the parts!
And the cost is?????
You'll probably end up spending about the same amount if you machined it all yourself, if not less. It's not as expensive as it sounds, especially if the parts are small, but it won't be super cheap. If you have your own 3D printer already (which can range anywhere from $400 to $4,000) then printing will be cheaper than if you used Shapeways.

If you don't have a 3D Printer, you can go here and upload 3D models. You can then pay them to print it for you and ship it to you. There's a marketplace where you can buy things made by other people. Anything from Iphone cases to parts for model cars. I believe there's some siren parts there too, rotors and stators and such, but I haven't bothered to look.
http://www.shapeways.com/
THUNDERBOLT HAS BEEN SOLD

Frotz
 
Posts: 18
Joined: Fri Sep 12, 2008 8:46 am

Re: Replicating the mini thunderbolt

Sun Dec 07, 2014 8:27 am

I didn't think of 3D printing. The hackerspace I'm thinking of has a 3D printer capable of making objects in bronze, among other metals. For this, I think it would be best to make the chopper, stator, and lid. The rest of the chopper group might be easily done with common pipe. Eric's effort seems to tightly wrap around a particular motor. Perhaps the stator could be made a little larger with an eye to accepting a wider variety of motors to defend against obsolecence.

Next question: What's the math for choosing where to put the holes in a two-toned chopper such that the chopper is balanced?
On a clear disc you can seek forever.

bragsdale2
 
Posts: 16
Joined: Tue Dec 02, 2014 1:00 pm
Real Name: Bill R

Re: Replicating the mini thunderbolt

Sun Dec 07, 2014 2:09 pm

Frotz wrote:I didn't think of 3D printing. The hackerspace I'm thinking of has a 3D printer capable of making objects in bronze, among other metals. For this, I think it would be best to make the chopper, stator, and lid. The rest of the chopper group might be easily done with common pipe. Eric's effort seems to tightly wrap around a particular motor. Perhaps the stator could be made a little larger with an eye to accepting a wider variety of motors to defend against obsolecence.

Next question: What's the math for choosing where to put the holes in a two-toned chopper such that the chopper is balanced?
Here is what i have come up with:

360°/4=90°= The slots are 90° from each other
360°/5=72°= The slots are 72° from each other
I would put this in Inventor, but i am busy today. Hope i helped :thup:

Frotz
 
Posts: 18
Joined: Fri Sep 12, 2008 8:46 am

Re: Replicating the mini thunderbolt

Sun Dec 07, 2014 10:33 pm

bragsdale2 wrote:
Frotz wrote:I didn't think of 3D printing. The hackerspace I'm thinking of has a 3D printer capable of making objects in bronze, among other metals. For this, I think it would be best to make the chopper, stator, and lid. The rest of the chopper group might be easily done with common pipe. Eric's effort seems to tightly wrap around a particular motor. Perhaps the stator could be made a little larger with an eye to accepting a wider variety of motors to defend against obsolecence.

Next question: What's the math for choosing where to put the holes in a two-toned chopper such that the chopper is balanced?
Here is what i have come up with:

360°/4=90°= The slots are 90° from each other
360°/5=72°= The slots are 72° from each other
I would put this in Inventor, but i am busy today. Hope i helped :thup:
That's the easy part of the problem. Positioning N slots is easy; just do 360 / N. Now consider two sets of slots stacked. If you have one slot right on top of another, that side might be lighter than the other side and therefore the chopper will be unbalanced. The problem I want to solve is how the top set should be aligned with the bottom set to minimize any imbalance. If N1 is divisible by N2, then simply putting one slot on top of another will work. With N1 = 5 and N2 = 4, that's not so easy.
On a clear disc you can seek forever.

User avatar
sirendude2012
Registered User
Registered User
Posts: 665
Joined: Sat Aug 11, 2012 1:49 pm
Real Name: Michael Borjas
YouTube Username: legomn54321
Location: Fremont, Ohio

Re: Replicating the mini thunderbolt

Sun Dec 07, 2014 11:55 pm

Frotz wrote:That's the easy part of the problem. Positioning N slots is easy; just do 360 / N. Now consider two sets of slots stacked. If you have one slot right on top of another, that side might be lighter than the other side and therefore the chopper will be unbalanced. The problem I want to solve is how the top set should be aligned with the bottom set to minimize any imbalance. If N1 is divisible by N2, then simply putting one slot on top of another will work. With N1 = 5 and N2 = 4, that's not so easy.
What you do is model and print the rotor with no regard to balance, then when you get it, balance it.
THUNDERBOLT HAS BEEN SOLD

User avatar
CDV777-1
Registered User
Registered User
Posts: 1147
Joined: Tue Jan 02, 2007 1:49 am
Real Name: Eric
YouTube Username: vanamonde2
Location: Allen Tx
Contact: Website

Re: Replicating the mini thunderbolt

Sun Dec 07, 2014 11:57 pm

That's the easy part of the problem. Positioning N slots is easy; just do 360 / N. Now consider two sets of slots stacked. If you have one slot right on top of another, that side might be lighter than the other side and therefore the chopper will be unbalanced. The problem I want to solve is how the top set should be aligned with the bottom set to minimize any imbalance. If N1 is divisible by N2, then simply putting one slot on top of another will work. With N1 = 5 and N2 = 4, that's not so easy.
After I read this I thought of what Tom Hanks (playing Jim Lovell in Apollo 13) said to Kevin Bacon (playing Jack Swigert)
There's a thousand things that have to happen in order.
We are on number eight. You're talking about number 692.
Proud owner of a garage full of junk.

Return to “Main Outdoor Warning Sirens Board”

Who is online

Users browsing this forum: Bing [Bot] and 37 guests